Newcomers to iPhone development are sometimes surprised at how ugly the standard button controls are. They quickly learn that they need a graphic artist to create a nice-looking button image in Photoshop and then attach that to the buttons. However, in this tutorial, I'll show how to create nice shiny buttons in code, without any image files, by using a CAGradientLayer.
(Update (2010/5/20): Jeff LaMarche has posted code that is more capable than the code here, and I'd recommend taking a look at it. See his Improved Gradient Buttons post.)
(*Update (2014/11/20): Note that with iOS 7 and later, shiny curvy buttons are no longer typical in iOS user interfaces. The code described below should still work, but consider using the standard iOS button appearance instead.)
The source code can be downloaded here: gradientbuttons-tip.zip. It is also available on GitHub.
You can also follow along by looking at the source files in your web browser:
Creating the Buttons in Interface Builder
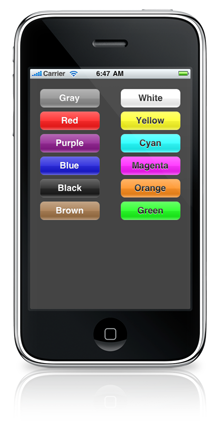
We'll start by laying out a view containing buttons. In Xcode, create a new View-based iPhone application, and call it "GradientButtons" (or whatever you want). Double-click the GradientButtonsViewController.xib resource to open it in Interface Builder.
Drag a UIButton control from the library onto the view. Set its properties like this:
- Change the type to "Custom"
- Set the title to "Gray"
- Change the text color to white
- Change the background color to gray
If you want to get fancy, you can also change the font, set the shadow, and so on.
For purposes of this tutorial, I then created several copies of this button, and set each to have a different background color and title. You can skip that if you just want to see what a single button looks like.
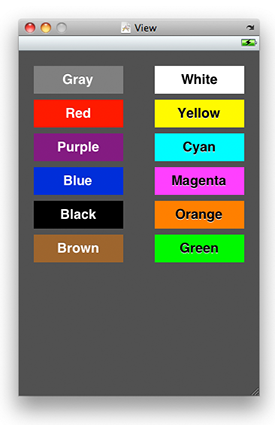
Save the Interface Builder file, and then run the project in Xcode. It works, but where are those shiny buttons I promised?
Adding the Shine Layer
To give the buttons the glossy shine, we'll add a CAGradientLayer overlay to each button. The overlay will be partially transparent, so the underlying text and background color will show through.
Define a new class, GradientButton, derived from UIButton, like this:
// GradientButton.h:

#import <UIKit/UIKit.h>
#import <QuartzCore/QuartzCore.h>

@interface GradientButton : UIButton {
    CAGradientLayer *shineLayer;
    CALayer         *highlightLayer;
}
@end
The first thing we want to do is give the button rounded corners and a border. This is easily done by setting the button's root layer's cornerRadius and masksToBounds properties, and using a border color that is a transparent gray (so that the actual background color will show through).
- (void)initBorder {
    CALayer *layer = self.layer;
    layer.cornerRadius = 8.0f;
    layer.masksToBounds = YES;
    layer.borderWidth = 1.0f;
    layer.borderColor = [UIColor colorWithWhite:0.5f alpha:0.2f].CGColor;
}
Next, we'll create the shine layer. All we need to do is create a CAGradientLayer, set its frame to match the button's bounds, and set the colors and locations properties to arrays of colors and locations.
We set the gradient colors and locations like this:
- At the top, pure white with 40% opacity
- At the middle, pure white with 20% opacity, giving us a nice shine on the top half of the button
- Then, switch to a medium gray with 20% opacity, making the bottom half of the button darker than the top half
- Finally, at the very bottom, go back to pure white with 40% opacity to give the appearance of a little inner glow
Note: I came up with these parameters after a lot of trial and error, to make the shine look good against all the background colors in my sample app. You will probably want to tweak them for the specific colors and overall look of your application. Make it shinier, make it flatter, give things a warm orangish glow rather than white, whatever. It's your app; do what you want to do.
After setting those properties, we add the layer to the button's root layer.
- (void)addShineLayer {
    shineLayer = [CAGradientLayer layer];
    shineLayer.frame = self.layer.bounds;
    shineLayer.colors = [NSArray arrayWithObjects:
                         (id)[UIColor colorWithWhite:1.0f alpha:0.4f].CGColor,
                         (id)[UIColor colorWithWhite:1.0f alpha:0.2f].CGColor,
                         (id)[UIColor colorWithWhite:0.75f alpha:0.2f].CGColor,
                         (id)[UIColor colorWithWhite:0.4f alpha:0.2f].CGColor,
                         (id)[UIColor colorWithWhite:1.0f alpha:0.4f].CGColor,
                         nil];
    shineLayer.locations = [NSArray arrayWithObjects:
                            [NSNumber numberWithFloat:0.0f],
                            [NSNumber numberWithFloat:0.5f],
                            [NSNumber numberWithFloat:0.5f],
                            [NSNumber numberWithFloat:0.8f],
                            [NSNumber numberWithFloat:1.0f],
                            nil];
    [self.layer addSublayer:shineLayer];
}
Note that, because we are adding the layer as a sublayer, we don't need to retain the shineLayer here.
With those methods written, now we just need to define an awakeFromNib method so that they will be called when the buttons are loaded from the NIB. I also override initWithFrame: so that my snazzy buttons can be created programmatically rather than being loaded from a NIB.
- (void)initLayers {
    [self initBorder];
    [self addShineLayer];
}

- (void)awakeFromNib {
    [self initLayers];
}

- (id)initWithFrame:(CGRect)frame {
    if (self = [super initWithFrame:frame]) {
        [self initLayers];
    }
    return self;
}
You'll need to add the QuartzCore framework to your project to get it to link.
The last thing we need to do is go back to Interface Builder and, for each button, go to the Identity inspector and change the class to GradientButton, then save.
With that done, build and run the app. Now we have pretty buttons. However, if you press a button, nothing seems to happen. We need to highlight the button when it is touched.
Handling Touch Tracking
Back when I told you to define the GradientButton class, you may have noticed the highlightLayer instance variable, and wondered what that was for. Well, here's the deal: when the user touches the button, we'll just show a layer that makes the button look highlighted, and when the user stops touching the button, we'll hide that layer. Simple!
So, we'll create a simple layer with a partially transparent gray color, set it to be hidden, and add it beneath the shine layer.
- (void)addHighlightLayer {
    highlightLayer = [CALayer layer];
    highlightLayer.backgroundColor = [UIColor colorWithRed:0.25f
                                                     green:0.25f
                                                      blue:0.25f
                                                     alpha:0.75].CGColor;
    highlightLayer.frame = self.layer.bounds;
    highlightLayer.hidden = YES;
    [self.layer insertSublayer:highlightLayer below:shineLayer];
}
If you don't like gray, change the color as needed.
Then, we override the setHighlighted: method so that the highlight layer is displayed whenever the button is touched (or any other time its highlighted property would be set true):
- (void)setHighlighted:(BOOL)highlight {
    highlightLayer.hidden = !highlight;
    [super setHighlighted:highlight];
}
Note that because hidden is an animatable property, the highlight will fade in and fade out smoothly during a transition.
Finally, we need to change our initLayers method so that it calls addHighlightLayer:
- (void)initLayers {
    [self initBorder];
    [self addShineLayer];
    [self addHighlightLayer];   // added line
}
Run the app, and the buttons should light up when you touch them.
But, Do the Buttons Actually Work?
Just to verify that our snazzy GradientButton class hasn't somehow broken the basic button functionality, add an event-handler method to the GradientButtonsViewController class.
// GradientButtonsViewController.h:

#import <UIKit/UIKit.h>

@interface GradientButtonsViewController : UIViewController {
}
- (IBAction)colorButtonClicked:(UIButton *)sender;
@end
The event handler will just set the view's background color to match the color of whatever button was clicked.
// GradientButtonsViewController.m:

#import "GradientButtonsViewController.h"

@implementation GradientButtonsViewController

- (IBAction)colorButtonClicked:(UIButton *)sender {
    // Set view's background to match button color
    self.view.backgroundColor = sender.backgroundColor;
}

@end
Go back to Interface Builder and wire up the buttons to the controller's colorButtonClicked: handler.
Run the app, and you should see the background change whenever you click a button.
Exercises for the Reader
That's basically it, but you can extend these ideas in a lot of ways. For example:
- When the
enabledproperty of the button gets set to false, you can "dim" the button by changing its opacity. - Use another layer to handle the button becoming
selected. - Instead of using static layers, add some animation. For example, your shiny button could pulsate while idle, and grow slightly when touched.